Problem Statement:
- Release the features (Change Requests) as soon as the UAT is completed instead of waiting for monthly OR bimonthly service windows (planned releases).
- Release the small change requests on a weekly basis with minimum system downtime (which otherwise has to wait for monthly release to put it on production)
Limitations and flaws of traditional release process:
- Building the code manually on build server was time consuming and error prone
- Huge wastage in time and resource utilization as someone was always required to push latest build on testing server
- Branching and merging strategy was missing (we were breaking existing UAT approved items as those items were sitting on a staging server waiting for a production release)
Technology Stack:
Sharepoint, Visual Studio 2013, Azure, Microsoft Test Manager
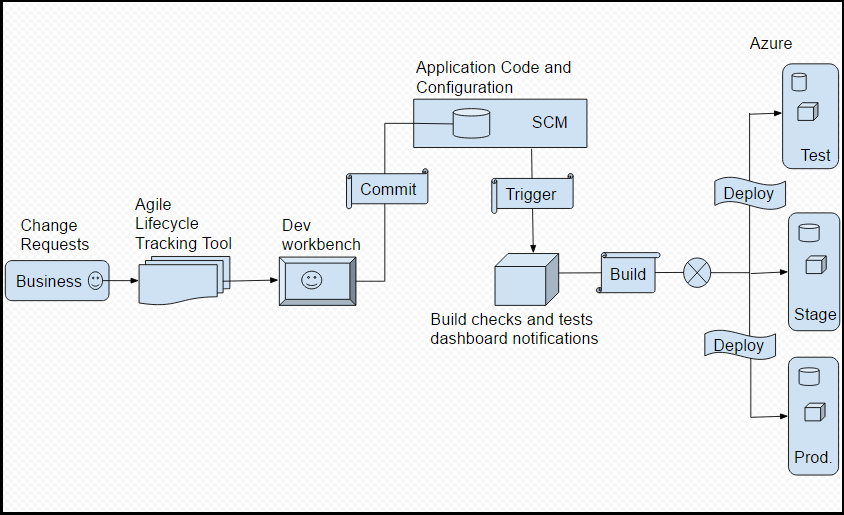
How we achieved it:
Earlier there was no infrastructure to manage these weekly releases so we created a high level plan to visualize our development workflow and infrastructure required for a faster delivery of features.
Challenges:
We initially started executing our builds on hosted build agents but later on faced issues with SharePoint DLLs. The biggest challenge was to insert those DLLs on hosted build agents through code but that approach has its own limitations.
Solution:
We moved on to Default build agents on the VMs provisioned for Testing and Staging. I followed below steps to achieve that.
Deploy a windows build agent on build machine.
This is required when using external build machine to do builds from MS Release Management portal (VSTS). The “default” option in MS release management uses VSTS hosted build agent which cannot run functional tests created using Selenium or LeanFT in Visual studio.
- Detailed steps are presented here
Pre-requests for this from the above link
- An operating system that is supported by Visual Studio 2013 or newer
- Visual Studio 2013 or Visual Studio 2015
- PowerShell 3 or newer (Where can I get a newer version of PowerShell?)
Detailed Steps -
- On the machine where you are going to run the build agent, open a web browser.
- Login to
Visualstudio.com - Select your account(make sure you are the owner)
- Select the gear on top
- Select
Agent pools->Download agent - Unzip the .zip file into the folder on disk from which you would like to run the agent. To avoid “path too long” issues on the file system, keep the path short. For example:
C:\Agent\ - Run Command Prompt as Administrator, and then run:
C:\Agent\ConfigureAgent.cmd - Respond to the prompts.
- Login to your account, when configuration is successful You will see the new agent now appears on Visual studio team services account
Now this agent can be used for builds and deploys from MS release management portal.